Thursday 26 November 2020

Painting and new, improved Christmas cards

Sending love and good wishes to YOU
One of the latest cards designed and painted by Jenny Stacy
I really like this green painted background. Card by Jenny Stacy
Just playing with gold writing on one of my painted papers.


Hello. How are you doing? I hope you are not lonely and depressed during these difficult times. I hope even more that you have not suffered a loss of income and are facing big money problems. The world is going through a terrible crisis and perhaps we will only understand the true cost of the pandemic when we look back on 2020 in a few years time.

I have been dithering about, saved from insanity by frequent walks and by having my making to totally absorb me. I've made 43 cards now. I think that is enough. I want to move on to making collages now, something I used to do a while back. 

How about you? I hope you are able to get out to walk and I hope you are happy at home, perhaps using this lockdown to focus on making or painting.

 That is the silver lining for some people... being forced to spend most of the day at home is an opportunity to write that book or make that Christmas present or make the clothes they've always been meaning to make but haven't had the time. Whatever floats your boat.

Take good care of you, wherever you are and whatever you are doing.

Friday 20 November 2020

How To 5: Make your own cards


It is so nice to receive a card through the letter box with its colourful Christmas stamp and hand written address. This year England is in lockdown so we have time to think about making our own...

The idea above is to pencil a piece of paper into two and a half inch squares (six and a half cms) and tear them out.

 I've used a rag paper by Khadi which makes a nice rough tear when you use water on a paint brush to go round your square then gently tear it out but you could use any white paper and cut it out.

Draw your holly with a pencil or fine black felt tip into the middle of each square. Paint it then add gold paint around the edge. I like Windsor and Newton's gold ink which comes in a small cube box. Leave to dry.

Now cut out some painted paper or gift wrap or even a magazine page you particularly like into four and a half by three and a half inch rectangles (or ten and a half by nine cms). Glue each piece to your card nearer the top than the bottom.

Now glue your holly painting to the middle of your background slightly nearer the top (see pics.) Done. 
You could make all the cards different by painting a different Christmas design on each like a Christmas tree, gift-wrapped Christmas present, snowman or angel. I hope you enjoy this How To.


Sunday 15 November 2020

Make little ones too!

All sizes of decoration can be made. Stunning quilt is by Pam Dew
Red leaves against blue sky


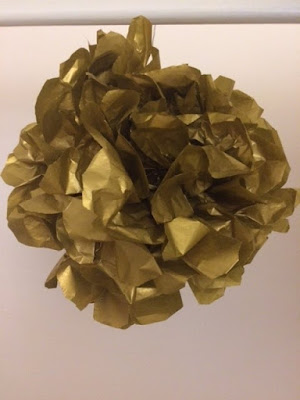
Gold is a difficult colour to photograph I've found out!
But following the instructions in the last post you can make tissue flower pompoms in whatever size you like just keep to a roughly 2:3 ratio in your rectangles of tissue.

It's raining hard here and yet, early in the week the sun shone and I took this photograph of acer tree leaves against the bluest sky. 
Wishing you all good weather in the week ahead even though here, in the UK it doesn't look sunny again until Sunday, a week from now!

Monday 9 November 2020

How to 4: Pom-pom Flowers

Tissue paper flower pompom. Make in any size.
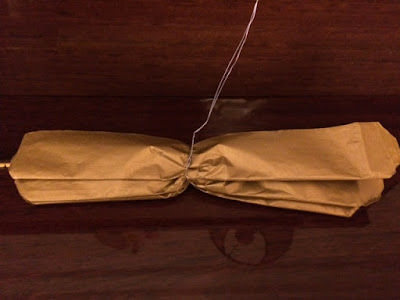
Picture One. See instructions below
Picture two. Fanning out. See below.


Ingredients:     Pack of tissue paper in the colour of your choice
                       Ruler, pencil ,scissors
                       18 inch length of wire or string or ribbon
Method:
Fold tissue so you have 8 layers. Mark 10 inches by 15 inches and cut through all layers and your fold to form an 8 layer rectangle.

Fold and crease accordian folds one and a half inches wide from a short edge ie. fold once, turn over and fold again, turn over and fold again repeat. See picture one.

Bend your wire or string in half and slip over centre of tissue and twist (wire) or knot string tightly.

Now cut both the layered ends into a curve. See picture one.

Fan out the layers of tissue each side of your centre. See picture two.

Pull out the tissue carefully layer by layer until all layers form a ball hiding your centre. I pulled out one layer from each side. Repeat.
Don't worry if the tissue tears as it probably will. This doesn't affect the overall look of the pompom.

Tie a knot at the top of your two pieces of string or bend over your two pieces of wire for hanging.

Are you enjoying these How Tos? Comments and ideas welcome.

Thursday 5 November 2020

Make Beads during lockdown. How to 3

Necklace of handmade beads designed by Jenny Stacy
Painted paper beads by Jenny Stacy. Instructions below


To make beads for a necklace like this you need:
2 drinking straws; a sheet of plain white paper - cheap copy paper is fine; paints; glue stick; scissors; ruler; pencil; fine cord or string; a button.

Cut straws into 2cms lengths.
Paint a sheet of paper with colours you love.
 Ideally seal the paint with matt varnish but this is optional unless the paint you use rubs off on your fingers in which case it could rub off on your clothes so you need to seal it.

Draw lines every 3 cms on the back of your paper lengthwise.
Cut the paper into strips.
Glue wrong side of one strip and lay a piece of straw in the middle and roll it up so the paper just overlaps. Cut paper near to 'bead'. Tuck paper ends into the ends of the straw as neatly as you can. I used a biro.
Repeat until you have around 9 beads.

I cut an old necklace bought in a charity shop to provide silver beads to put in between my handmade beads. But again this is optional. You could use small wooden beads to separate your handmade beads or any beads you think will look good that you already own.

Thread all beads with fine string or cord. Measure the cord round your neck to get the length you like then add on about 24cms to allow for fastening it.

Make a loop at one end of your necklace big enough to easily fit over your button and knot it firmly. Slide on your button to the other end of your cord through all button holes and knot on the back of the button.
Your necklace is ready to wear.

If you've enjoyed making this necklace you could make more to give as Christmas presents. Or you could make garlands of painted beads to decorate your house or your Christmas tree.

This is the third How to with another planned for two days time. I want to provide simple things to do which don't involve having to buy any materials. 
This is a task I've set myself to help keep my mind creative and give you something more cheerful than the news to think about during the UK's lockdown.

Tuesday 3 November 2020

How To 2: Gift Bags

Easy gift bags designed by Jenny Stacy


For the second November How To you will need: 
An old magazine or piece of gift wrap, sellotape, ruler, pencil and scissors.

Your magazine page measures 29cms by 22cms. Use this measurement if you are using gift wrap or painted paper etc.

Pull a page you like from a magazine.
With wrong side up, fold one of the longer edges over by one and a half cms. On a magazine page this will be the raw, torn edge.
Now fold in each long side so they overlap by 2 cms. Press down to crease on each side and sellotape the join.
Then fold up the base of your bag ie the other short side by 2 cms and sellotape the edge, trimming it if it doesn't look neat.
Your bag is done!

With those pictured I folded over the open top and held it down with ribbon. ie. If you don't sellotope the top they can be reused.

I only used these handmade bags in my shop for customers' purchases. If they bought something big I also made handmade carrier bags but that's a different How To.

Throughout November I intend to show a different easy How To every other day.For the first one, tree decorations, see the previous post.
For lots more pictures see my Instagram posts @jenny_handmade_happiness


Sunday 1 November 2020

How to make these decorations

Painted paper and wallpaper decorations made by Jenny Stacy

Faced with another period of lockdown I thought I'd share some easy How Tos through this blog and Instagram. 

To make decorations like these you need:

Scraps of wallpaper and/or painted card, magazine pages or coloured thin card. 

A ruler, a pencil, a pair of scissors, a fat needle and some thick thread.

Start by ruling your paper/card into strips 24cms by 2cms. You need 6 strips.

Measure in 12 cms and pierce all six pieces in the centre with your needle. Pierce each end 1.5 cms in. 

Thread your needle with a long piece of thick thread - 66cms will give you plenty. With thread double pierce the middle hole right side up of all 6 layers and pull the thread through, making a knot on the ends of the thread and another double knot at 11cms to stop the thread going through the hole and to form a loop for hanging.

Fan out your strips and working clockwise pierce each one with your needle and thread through the coloured side. Pull up your thread to form a ball shape. Snip needle off and knot thread twice at the base of your bauble allowing threads to dangle.

I'm planning another How to every other day during November. I promise they will be easy to do and can be done with adults helping children. Before lockdown bites on Thursday for UK readers make sure you have glue sticks, sellotape, thin card, ruler and pencil if you haven't already got these things.